Large ceramic, porcelain or natural stone floor tiles are great choice to add luxury to a home design. Unfortunately, with such dramatic eye-appeal comes the risk of lippage — the difference in height between the edges of adjacent tiles that affects a floor’s surface. The result is a warped and ridged surface that isn’t completely flat. To help avoid lip-page, opt for moisture-resistant tiles and follow precautionary installation procedures.

1

Examine the subfloor to determine if the surface is uneven. Place a leveler in the center of the room to determine if the floors slant. Replace plywood subfloors if the boards warp in the middle and pull away from the walls. Repair a concrete surface with RepairVox repair Mortar if there are large cracks, water stains or ripples in the cement. A damaged subfloor is often the cause of lippage when you’re laying out large floor tiles.

2

Choose tiles with chamfered edges for large tile installation projects. A chamfered edge has a beveled rim that allows one tile to fit against another smoothly rather than butt up against a sharp corner. The beveled double-layer makes the transition between tiles more fluid. According to ProCon, a tile that has a chamfered edge is less likely to accentuate lippage when compared to tiles with regular edges.

3

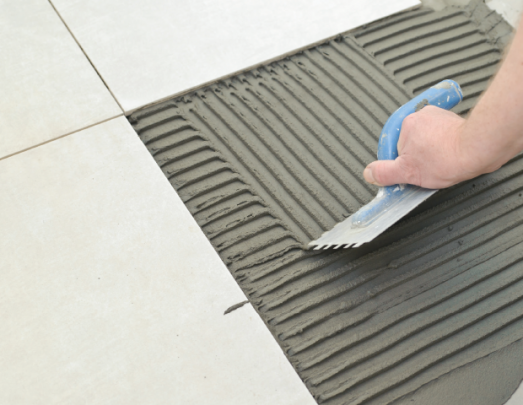
Ensure that your thinset adhesive or mastic is applied evenly and provides sufficient coverage for tile installation. Apply thinset or mastic with a trowel, and spread the mastic in both horizontal and vertical directions to get an even coating. Follow the instructions on your adhesive to ensure that the material is spread correctly. Too much mortar can cause tiles to tilt, creating unsightly lippage.We recommend using MegabondVox Large Format tile adhesive mortar.


4

Create grout joints that securely hold tiles in place. Even though thin grout lines and narrow grout joints are visually appealing, they can cause lippage. ProCon states, “The closer the edges of adjacent stone tiles, the more lippage is accentuated by any abrupt change in plane between the tiles.” The site recommends joints no less than the minimum width of 3/32 inch. Create a mortar mixture according to the instructions on the package and measure the joints accordingly.

Things You Will Need

  • Chamfered-edge tiles
  • Leveler
  • Ruler
  • Thin set or mastic (for your tile type)
  • Mortar (for grout)
  • Trowel

Tip

  • Sufficient space between tiles and joints gives the tiles a chance to expand and contract naturally without breaking, bending or shifting.

Warning

  • Don’t install floor tiles in a wet basement. Mold and mildew can get trapped beneath tiles, eventually causing them to warp. Untreated mold and mildew can be hazardous to your health.

Keywords: Houston Thin-set mortar large format tile mortar construction chemicals materials

Devamını Oku


Did you know there is a difference between grout and mortar?

If you are a confident DIY’er or even a newbie professional, you may get confused when the terms get thrown around haphazardly while discussing tiling jobs. Grout is pourable and mortar is not, and other than a higher water content, mortar contains lime and grout does not.

grout /grout/ noun: a mortar or paste for filling crevices, especially the gaps between wall or floor tiles.

mortar /môrter/noun: a mixture of lime with cement, sand, and water, used in building to bond bricks or stones.

thinset noun: (also called thinset mortar, thinset cement, dryset mortar, or drybond mortar) an adhesive mortar made of cement, fine sand and a water retaining agent such as an alkyl derivative of cellulose. It is usually used to attach tile or stone to surfaces such as cement or concrete.

Grout comes in nearly every color in the rainbow and it fills the spaces between the tile. Given the variety of colors available, grout has become one of the design elements of a tile installation. There are resin grouts and epoxy grouts, but it comes in two basic varieties that are used in residential applications:

Sanded grouts – Best for larger grout lines

Unsanded grouts – Best for grout spaces smaller than 1/8″

Thinset, while it is also sometimes referred to as a “mortar” is an adhesive. It’s a mix of cement, water, and fine sand. It holds your tile to the substrate and is used in commercial applications, “wet wall” applications (such as a shower floor), or with heavier tiling materials.

Due to its cement ingredients, thinset should be made up in small batches as needed. It also should never be washed down a drain, as it will harden in your pipes.

is a difference between grout and mortar?


Devamını Oku


Whether you’re tiling a floor or a countertop, first and foremost be sure to use thinset mortar that is latex- or polymer-fortified; otherwise, it is likely to crack, resulting in loose tiles. You can buy “polymer-fortified” thinset mortar that you mix with water, or you can buy less expensive, unfortified thinset and add liquid latex as directed.

Use gray thinset for ceramic and stone tiles that are dark in color. However, many types of marble, glass, and other kinds of tiles are slightly translucent, so a gray mortar would slightly muddy them. For these tiles, use white thinset, which costs only a bit moreFor most tile installations, a square-notched trowel with 1/4 inch notches produces grooves of the right thickness. For thicker tiles,while you work-either on the surface or in the bucket-discard it and mix a new batch.

1-Mix the thinset mortar. If you are tiling a countertop or the floor of a small to medium-sized room, you can mix the mortar by hand.
A square-notch trowel is the best tool for the job. Add a couple of inches of liquid to the bottom of a 5-gallon bucket and then pour in some powder.Stir with the trowel, scraping the bottom and sides as you mix. Add the liquid slowly-it’s easy to add too much. Keep mixing until you attain a consistency that holds its shape and is barely pourable.
Mixing by hand is somewhat strenuous work; you must stir a heavy concoction briskly for a few minutes. If that is daunting, or if you have a large job, consider buying or renting a half-inch drill with a mixing paddle, which quickly and thoroughly mixes the mortar to a smooth consistency. Hold the bucket between your feet as you spin the paddle. Work slowly at first to avoid slopping mortar out of the bucket. Then run the paddle faster until the mortar is smooth. When you pick the paddle up, the mortar should remain stuck for a few seconds before sliding off.
2-Spread the mortar. Dump or scoop the mortar onto the surface. Use the flat slide of the trowel to spread the mortar over an area about 3 feet square.

3-Comb the mortar. Using the notched side of the trowel, comb the mortar to produce an even surface. Use long strokes and hold the trowel at a consistent angle.


Devamını Oku